
How to Press Loose Shadows
Hello! I feel like there are a million and one tutorials out there about pressing loose eyeshadows, and I am by no means an expert on this, but I thought I'd walk you through how I do it just in case it's helpful to see the million-and-second tutorial about it.
I hate using loose eyeshadow and other powder products. I don't think my fellow bloggers mind it quite as much as I do, but it just annoys me so much. Sifter jars are OK, but I hate the dance of having to shake-shake-shake the loose powder into the lid and then dab up what never seems like enough powder with my brush, rinse, repeat.
Sample baggies are OK too, but I feel like I always get way too much powder on my brush, or it's unevenly distributed, and then I get spots of color on my eye or fallout under it. Jars without a sifter are the worst of both worlds, with the added bonus terror of my hand possibly shaking or bumping something and spilling the loose eyeshadow everywhere. So when I have a loose eyeshadow in something that's not a sifter jar, my top priority if I want to actually use it day-to-day is to press it into a pan.
I learned how to do this primarily from Drivel About Frivol and Portrait of Mai's excellent tutorials on the subject. I can guarantee you they're going to be better tutorials than this one, but sometimes seeing something presented by a different person can be helpful!
Materials list!
Here is what I, personally, use for pressing:
- 26 mm round tin pans from TKB Trading. I use these because they are magnetic. They can rust, so you can use aluminum pans instead of you're concerned about that. I am not.
- A pressing tile/tamping tool from TKB trading that looks like a doorknob with a metal disc at the end. They seem to have discontinued it in favor of these; you could jerry-rig your own handle with some superglue and a doorknob, I guess, or just use the handle-less version.
- TKB Trading's Pressing Medium
- TKB Trading's Pressing Ribbon
- Paper towels
- Toothpicks
- 91% rubbing alcohol
- Pipette, eyedropper, or even a coffee stirrer or straw, for dripping the alcohol
- Sticky paper labels (either the round ones or rectangular ones cut into small squares)
- Pen
- Loose eyeshadow. You should probably have a few different colors ready to go and combine into pans if needed, and be conscious of the amounts--you might need 4 different sample baggies to fill up a single pan, or a single mini jar might fill one single pan. Sometimes a mini will mix down to a much smaller volume than you'd expect, and you'll need to combine 2 in a single pan.
- A mixing pot, like a clean empty Sephora sample container, if the eyeshadow is not already in a little jar
Steps!
You know how when Julia Child first came on TV, she was a revelation because she cooked the way normal people would cook--drop something on the floor? "Oops! We'll just pick that back up and wash it off and continue!" I aim to be the Julia Child of eyeshadow pressing. You will see the various messy shortcuts and mistakes I take in the tutorial below--I am not super hygienic, but I have not yet gotten moldy eyeshadows/eye infections/etc. from this process.
1. Prep your workstation. In this case, my workstation is a desk and my prep consists of laying down a paper towel so I don't have to deal with cleaning eyeshadow spillage off the desk later.
2. Prep your tools. Get everything out. Wash your hands. Wipe down your pans and toothpicks with rubbing alcohol on a paper towel. Real talk: I don't always sanitize everything, on the assumption that I am about to blitz the inside of the pan and the tip of the toothpick with a rubbing alcohol mixture anyway so I'm not sure the earlier layer of alcohol really does all that much? I also frequently forget to wash my hands, but I don't put my hands directly into the eyeshadow so it probably is not a huge deal either.
3. Get your eyeshadow ready. You can tip your sample eyeshadow from a baggie into a little sample jar, or pry out the sifter, or if you're working with a mini jar without a sifter, just work directly in the jar. For Fyrinnae minis, I just work directly in the mini jar. In this tutorial, I dumped out about half of a Hello Waffle halfling (Catticus Finch) into a sample jar to work with, because I'd never pressed HW shadows before and it looked like a large volume of shadow. It turns out that one halfling will fill up a 26 mm eyeshadow pan just fine so I could have worked directly in the HW jar as well.
2. Prep your tools. Get everything out. Wash your hands. Wipe down your pans and toothpicks with rubbing alcohol on a paper towel. Real talk: I don't always sanitize everything, on the assumption that I am about to blitz the inside of the pan and the tip of the toothpick with a rubbing alcohol mixture anyway so I'm not sure the earlier layer of alcohol really does all that much? I also frequently forget to wash my hands, but I don't put my hands directly into the eyeshadow so it probably is not a huge deal either.
 |
| Sanitizing my pans |
 |
| Eyeshadow dumped into a separate jar for mixing |
4. Drip in the pressing medium and mix it with a toothpick. Go easy on this stuff! Adding too little is fixable (just grind up the underpressed eyeshadow, add more medium and alcohol, repress, repeat) but adding too much is not, and will make your eyeshadow hard and unpigmented. When I first tried this, I added 2 drops of medium and 2 drops of glycerin to each mini jar and most of my shadows came out harder than I would have liked. Now I just add 2 drops of medium and it seems fine. I add just 1 drop if it's a smaller amount like a sample baggie. For the newer semi-loose Fyrinnae shadows that already have some binder added, I would use only 1 drop of binder.
 |
| A couple of drops of pressing medium added |
 |
| Pressing medium mixed into shadow |
5. Drip in the alcohol and mix it with the same toothpick. I add probably about 10 drops of alcohol, ideally just enough to make it turn into a sort of mousse-like texture. More Julia Child-style corner-cutting real talk: most tutorials have you mixing this like scones, where you cut together the pressing medium and pigment first and then add the alcohol, but I'm not really convinced this is necessary. I pressed a few of my eyeshadows this batch by just dumping in the alcohol and the pressing medium at once and stirring everything together, and it doesn't seem to have done anything bad.
Anyway, you can see in my photos that I foolishly said to myself "I don't need to use a pipette!" I don't know why, because my pipettes were literally within arm's reach. But bottom line, I dumped a ton of rubbing alcohol in with my unsteady hand and now this is far soupier than what I meant to have happen.
There's no real harm in adding too much alcohol, though, because it will all evaporate off eventually--it just makes it hard to combine colors in a pan, and you have to wait longer before pressing. Consider this your first "Don't Do What Donny Don't Does" moment of this tutorial.
 |
| Add rubbing alcohol and mix |
 |
| Looks pretty, but it has too much alcohol |
 |
| If you have a firmer-textured mixture, you can easily spread it across only part of the pan so it can be combined with other colors |
In the case of the Catticus Finch I've been working on in my tutorial here, the next "Don't Do What Donny Don't Does" moment is that I realized that a single halfling would in fact fit into a 26 mm pan, so I mixed up the rest of the jar and poured it on top. This is probably too far much pressing medium for the amount of eyeshadow, but it actually still swatches OK, so I don't think I completely ruined it.
7. Press! Or.. wait and press, if you have a soupy over-alcohol'd mess of eyeshadow like my example here. Once enough alcohol has evaporated that you have something that's closer to Play-Doh or mousse in texture, you're good to go.
I usually cut a small piece of pressing ribbon just bigger than the pan (this piece in the photo is larger than average), stick it onto my eyeshadow pan, top it with a little piece of folded up paper towel to soak up excess alcohol, then put the tamping tool on top and press it down firmly. Colored alcohol will ooze up (I feel like I'm describing Mardi Gras on Bourbon Street) and get soaked up by the paper towel. Peel up all the layers and check the top surface. It should have nice hatch-marks on top. If it's too wet, you'll have little gloopy marks where the wet shadow stuck to the ribbon, and you may need to wait and press again. Or just live with it, since the hatchmarks will go away after a few uses anyway.
8. Wait. Let all the alcohol evaporate. Be patient. Once the shadow is dry, you should have a nice pan that's suddenly WAY easier to deal with than the sample baggie or loose eyeshadow jar! Now you can just swipe your brush across the surface and get a thin, even layer of eyeshadow on it without fear of spilling eyeshadow everywhere.
I usually cut a small piece of pressing ribbon just bigger than the pan (this piece in the photo is larger than average), stick it onto my eyeshadow pan, top it with a little piece of folded up paper towel to soak up excess alcohol, then put the tamping tool on top and press it down firmly. Colored alcohol will ooze up (I feel like I'm describing Mardi Gras on Bourbon Street) and get soaked up by the paper towel. Peel up all the layers and check the top surface. It should have nice hatch-marks on top. If it's too wet, you'll have little gloopy marks where the wet shadow stuck to the ribbon, and you may need to wait and press again. Or just live with it, since the hatchmarks will go away after a few uses anyway.
 |
| A length of pressing ribbon that I've cut to press a pan with two colors combined |
 |
| Pressing the eyeshadow with the pressing tool |
 |
| The finished product after peeling off the pressing ribbon |
 |
| The finished (wet) pans of eyeshadow from this pressing session |
9. Label your eyeshadows. I stick a handwritten sticker on the back of each one, or sometimes (I've done this with a number of my older Fyrinnae shadows) I peel off, trim and stick the original sticker from the jar onto the back of the pan.
10. Put together a palette! I have a ton of different options--a Book of Shadows palette (we reviewed them here), an Altoids tin lined with magnetic tape from the craft store (this is my favorite one), one of these TKB palettes (very pleasing that they fit perfectly into the little holes, but it's hard to pry them up to see the color names), a couple of these Coastal Scents palettes. My latest acquisition is one of these magnetic palettes from Jo-Ann that I got for $4 after seeing Nouveau Cheap's tip off about them. I have far too many, because I also went through an ill-considered depotting phase that made me use some of my mainstream eyeshadows LESS than before, and because I love Rouge Bunny Rouge shadows but they are expensive as hell so I get refill pans for any colors whenever that's possible. I plan to someday go through my DIY palettes and get rid of the pans with bad pigmentation or the ones I just don't use. Someday...
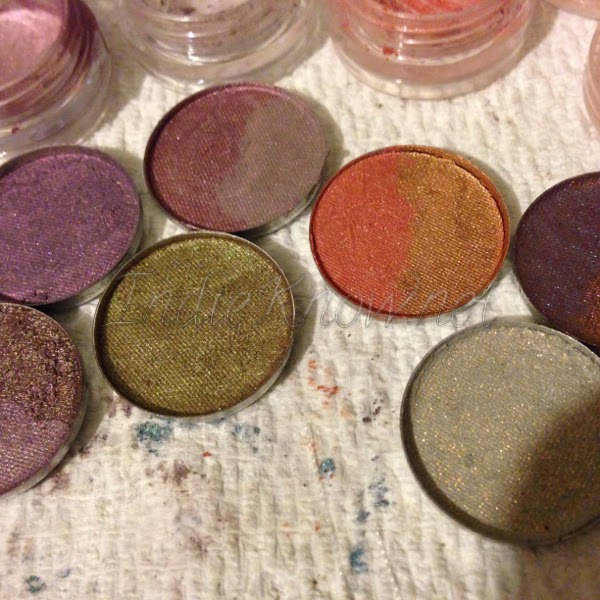
Here are the results of this pressing session, shown in the larger palette below! Shadows are from Fyrinnae, Hello Waffle, and Glamour Doll Eyes--let me know if you have any questions about any of them. (Upon preliminary swatching, nothing seems to have been ruined in the pressing process.) On top is my favorite little Altoids palette with my RBR shadows in it.
|
| Freestyle magnetic palettes |
 |
| More freestyle palettes |
I hope that was helpful! Let me know if you have any questions I can answer!
I don't actually mind using loose shadows, but storing them in a way that gives good overview? So so difficult. Don't really mind the jars either, and the bags are workable, but the worst packaging ever has got to be samples in clamshells!
ReplyDeleteSome people use binders with clear sleeves to store the baggies and I think that's a nice way to see them all! But I definitely have problems displaying the jars in a way where I can see what's in each one. Another reason to press the loose ones, for me :)
DeleteThose multicolor pans are SO fancy.
ReplyDeleteRight?? Mine always look super sloppy. I'm jealous of Valentine's skills here.
DeleteWow, this was awesome! I am actually really relieved - I posted my own "guide" to pressing indie shadows on my own blog a couple days ago and became totally paranoid that it was all terrible advice... but our pieces say almost the exact same thing so THANK YOU! Haha :) Loved reading this! Thanks for including your missteps, it's one of the most important parts of these kinds of things. I'm going to add this to my post as a resource!
ReplyDeleteGlad you got some comfort from it! Hahaha
DeleteThis comment has been removed by the author.
ReplyDelete